Step1. Get a domain
Get an email address with your business domain name and confirm it. This is important because emails sent from free domains can easily end up in the spam folder and may be considered suspicious by email service providers. Furthermore, free domains don’t allow you to connect postmaster tools that are crucial to monitor your campaign performance. Email service providers also restrict mass mailing from free domains.
On the other hand, getting an email address with your business domain name allows you to:
- Create beautiful business email addresses
- Easily manage accounts for your domain
- Increase the chances of getting your email to the recipient’s “Inbox” rather than their “Spam folder”
So, how can you get a domain? First of all, some website builders and hosting providers offer business email addresses for free after you purchase a domain. Otherwise, you can buy such an address through your email client. For example, Gmail offers custom business accounts from $6 per user per month.
Step 2. Warm up your domain
After purchasing your domain, spend some time warming it up. Email service providers are cautious about mail from new domains and IP addresses and carefully test such emails against stop words, balance of text and images, the number of undelivered emails, and spam complaints.
To protect against any issues with email marketing, make sure to warm up your domain beforehand. This might take around three months, depending on your subscriber list, mailing plan, etc. Here is what you can do to earn a good reputation for your domain.
- Set up an MX record, which is used to collect replies.
- Configure SPF and DKIM to confirm that you own the sender domain. These security mechanisms help prevent other people from sending emails on your behalf.
- Set up postmaster tools. These are programs that allow you to analyze mailing, check domain reputation, catch delivery mistakes, and adjust the campaign. For example, you can set up Google Postmaster Tools.
- Prepare a subscribers list. Make sure this list contains only valid contacts who agreed to receive your mail. If your list was created a long time ago, check its relevance by sending out a confirmation letter and asking users to re-confirm the subscription.
- Write email content that will be useful for subscribers and avoid spam filters.
- Create a mailing plan.
- Monitor performance of your newsletter and slowly increase its volume.
The main rule when warming up a domain is to gradually increase the volume of emails sent. A spontaneous mass mailing from a new domain or a sharp increase in the number of recipients might get your emails into spam folders or entirely block your domain.
The number of emails that you can send risk-free varies according to your domain reputation and lifetime, site traffic, thematic citation index, PageRank, etc.
Domain lifetime deserves special attention. If your domain is new, send only a few emails during the first few days, such as transactional emails. Later on, you can send out mass mailings to a limited number of users and slowly increase the number of recipients. At this point, it’s also important to set up the speed at which you send emails (for example, 500 messages per hour). Be sure to bear in mind each user’s time zone.
For older domains with high website traffic, thematic citation index, and PageRank, warming up won’t take much time or be necessary at all. Just remember to control indicators after sending each message and adjust your campaign accordingly.
Step 3. Test your email
Drafting a perfect email can take a while, but this time can all go to waste without thorough testing. To make sure your email campaign is pitch-perfect, double check all elements before clicking “Send”.
Preview text
Users spend around four seconds deciding whether or not to open an email, so it’s important to optimize the email preview and entice your recipient to click on your message. Double check your sender name, reply-to address, and subject line. If you used any emojis or special characters, make sure they open properly on different devices and across different browsers.
Some email service providers, such as Gmail and Outlook, display preview text right next to the subject line. Make your first couple of lines informative and to the point, so that they help readers understand your email content from the start. Also, ensure that preview text is mistake-free and is properly displayed.
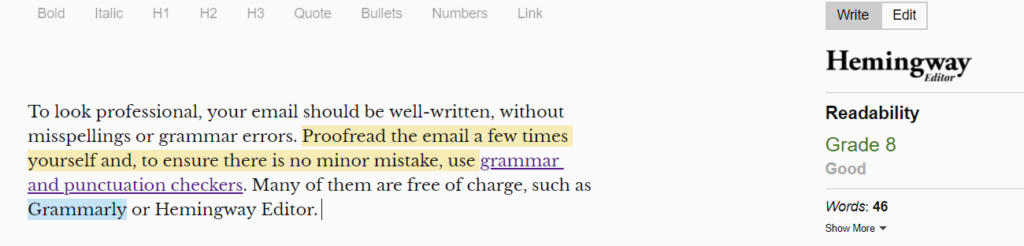
Grammar and spelling
To ensure a professional appearance, your email should be well-written and contain no misspellings or grammar errors. Proofread your email a few times yourself and, to ensure there are no minor mistakes, use grammar and punctuation checkers. Many of these services are free of charge, such as Grammarly or Hemingway Editor, and will check your spelling and grammar while helping make your text more readable.
Spam words
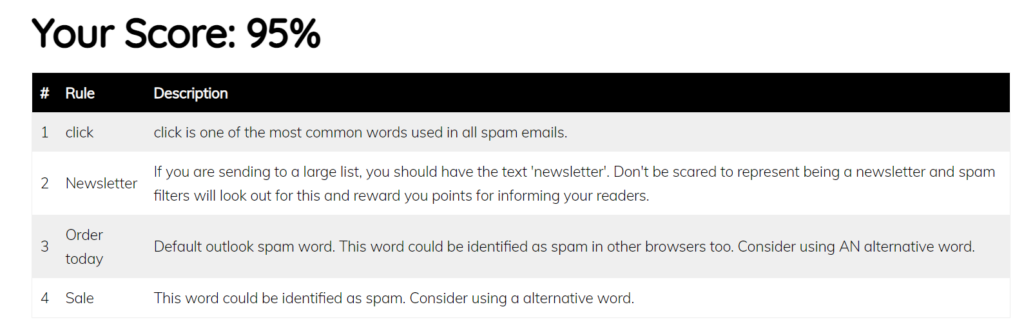
Next, check your email for spam words. These terms can trigger email service providers to send your message to the spam folder. These can be expressions like “call now”, “do it today”, “click below”, “increase sales”, etc.
To avoid getting lost in the spam folder, check your email using tools like IPQualityScore, Spam Analyse, etc. Below is an example from the Spam Analyse tool.
Email size
Email size greatly influences the loading time of your message and, as a result, user experience. Emails that are too large might not properly render on user devices because of a slow internet connection or if users simply don’t wait for your email to fully load. What’s more, email service providers have different policies regarding file size. Thus, Gmail will clip emails over 102kb.
So, how can you decrease the size of your email? First, make sure to compress images and remove unnecessary frames from animated GIFs. Here are some tools that might be helpful: ImageOptim, JPEGmini, CompressJPEG, etc. Second, your loading speed might also be influenced by coding style and custom fonts. For example, while fonts are loading, subscribers won’t be able to see your email text. Finally, try not to send emails that are too long, otherwise these services might cut it down.
Different devices
It’s likely that users will open your emails on different devices, so make sure to test the message across browsers and devices (both desktop and mobile). Rendering differences may result in a cut-off image, misplaced elements, and so on.
While the number of email services might be overwhelming, you might want to focus on checking how the email is rendered by the most popular email clients:
- Apple iPhone (39%)
- Gmail (26%)
- Apple Mail (12%)
- Outlook (8%)
- Yahoo! Mail (5%)
- Samsung Mail (2%)
- Apple iPad (2%)
- Google Android (1%)
Also, check how the email is displayed in dark mode. For example, some elements might blend into the background. To avoid this, you can match the outline color of elements with the main background color. While this will not be visible against a bright background, this change can be very helpful if users open your email in dark mode.
Check links and files
Make sure to check that all links work and lead users to the correct pages. You don’t want to lose a conversion opportunity just because you didn’t take the time to check your links. For the same reason, you need to double check tracking codes and affiliate markers, as well as whether the unsubscribe button works properly. Some email services won’t send your message if it doesn’t include a valid unsubscribe link.
If you use images, make sure they load properly. To be on the safe side, prepare alt text describing your image content. If the image doesn’t load for whatever reason, the alt text will show up in place of your image.
It’s especially important to test emails if you are using complex templates. Double check whether all files are in the right place and are properly displayed.
Send an email to yourself
After an email is drafted, send it to yourself and check whether it is properly rendered. Most importantly, check all the links. While users might not pay attention to misspellings, they won’t be able to click invalid links.
You can create accounts with different email providers to check how the email is displayed in each of them.
Use dedicated tools
While manually checking different email clients takes time, email marketing software makes this process very simple. Such programs help check not only the content of an email, but the sender reputation, deliverability score, etc. Most of these tools offer a free trial period, while others don’t charge at all:
Are you ready to send your newsletter?
Make sure to go over this email marketing checklist before pressing “Send” so that your email reaches your subscribers’ inboxes. Start by creating a business domain name and properly warming it up within a certain timeframe. Make sure to check your email newsletter for errors, as even the slightest misspelling or grammar mistake can make your message look unprofessional, while broken links will result in missed conversion opportunities.