
Why Track Visitors on Your Website
Analytics is the key to effective interaction with your visitors. The system shows where they come from, how much time they spend on a webpage, what buttons they push, and what pages they tend to leave sooner. It is advisable to install analytics right after publishing your website on the internet to collect statistics from the very beginning.
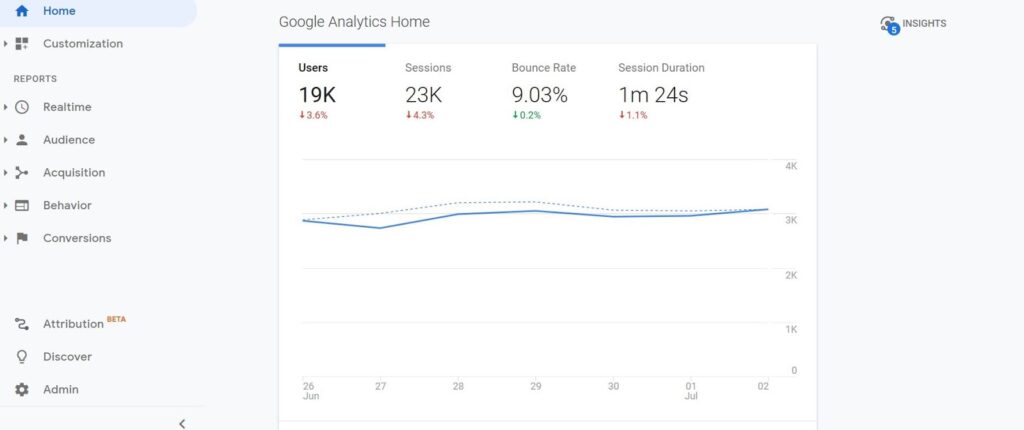
We recommend you to look through the reports once a week. Analyze entry points, dynamics of attendance, search engines percentage, bounce rate and other important figures.
For informational projects it is better to use a combination of Google Analytics + Yandex.Metrica + Google Tag Manager. Metrica records visits, saves click, and scrolling map. Analytics can be synchronized with Adsense, showing what pages bring more money.
Google Tag Manager works perfectly with GA and expands its functions. With its help, you can, for example, set up outbound link click tracking and see reports in “Analytics.” In this article, we’ve shared a step-by-step instruction on how to do this through GTM and gave recommendations for connecting the service to your website.
Read the instructions, create a container and go back to this section.
GTM is similar to website constructors. Imagine that you can redesign a website on your own without coding skills. Tag Manager works likewise: you choose a tag, set up parameters, and see reports in Analytics.
Gtm Functions
Google Tag Manager is a tag manager that simplifies integration with external services. It is compatible with websites and mobile applications. Later, we will give two examples of how to set up conversion tracking through GTM.
What you can do with Tag Manager:
1. Set up integration with popular services, such as Google Analytics, Yandex.Metrica, Liveinternet, AWIN, Google Optimize, and others. The whole list of services for integration is available in Google’s knowledge base.
2. Track conversion and goals like clicks on social media buttons or advertising widgets, form submission, or video reviews.
3. Count referrals through external and internal links. It shows whether interlinking works or if visitors just look through the content and leave.
4. Place an arbitrary code. Add micro marking and check website ownership in Yandex or Google.
5. Add tags of retargeting and remarketing. You can connect your audience in “pixels” and set up target advertising in social networks. This way, it is easier to get new subscribers into new societies.
Before sharing tips on how to work with GTM, let`s first go over major terms that you need to know.
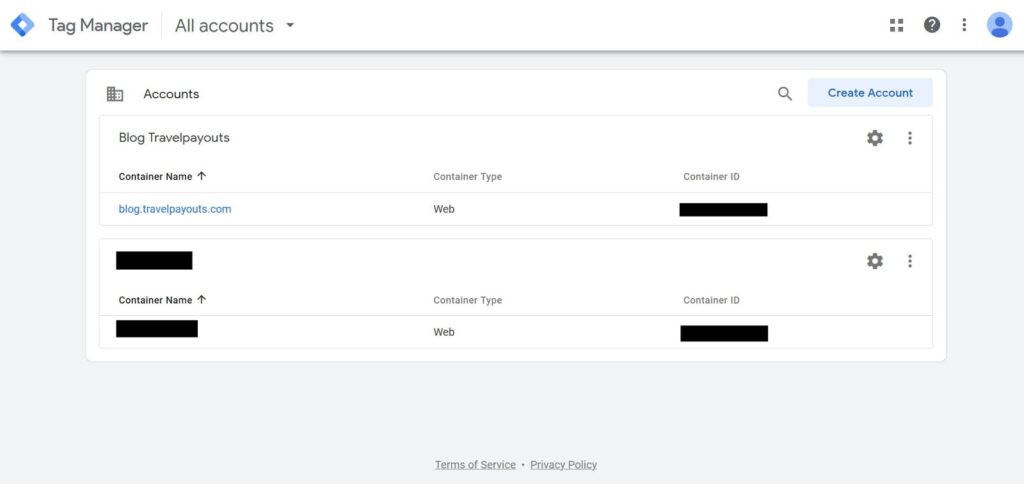
1. Container is a framework that keeps tags. You need to create a separate resource and container for each website or application. The framework has the main code that launches attached tags.
2. Tag is a fragment of code that functions under certain conditions. It helps track traffic and user behavior. GTM has lots of built-in tags that fulfill basic tasks. There is also the “Gallery of the community templates” with tags from external developers.
3. Trigger is an event that activates a tag. Filters give you flexibility in setting up trigger conditions: define URL or class of pages.
4. Variable is a parameter that is given a value. For example, a website has a subscription form for emails with a button. A click on this button transfers a value of a CSS-class to the variable. Variables work together with triggers. They set exact terms of activation.
Most likely, in the beginning you may encounter difficulties working in the editor. Metrica’s interface seems more native and familiar, while Google Analytics and Tag Manager look more complex. As if you change Lanos for Hammer, at first, it is awkward and weird, but a few drives later you feel like a king.
Advantages of Gtm
1. Single-time code insertion. You need to install a call-up template for Tag Manager and send the container to publication after adding new tags.
2. Works with any CMS. You can install it to WordPress, Joomla, Bitrix, ModX, or integrate it with an empty HTML.
3. Easy management. All tags and variables are collected in one place. They are easy to edit or delete. The update process of the contents requires only a few clicks.
4. Wide opportunities. You can complete any task with Tag Manager: install Metrica, Adsense code, or arbitrary HTML-code.
5. System of version control. The history of editing saves an activity log. You can roll a container back to the previous version if you notice that conversions are not calculated anymore or in case of any other issue.
6. Multi-user work. If you are not sure whether GTM has been properly set up, invite a more experienced colleague or developer to have a look.
7. Ready-made templates. There are integrated sets for Google Analytics, remarketing in Adwords, tracking phone calls after redirecting through advertisements and other options.
8. ctools. Review mode shows results of adding tags before publishing changes on the website.
9. Asynchronous tag upload. GTM has almost no influence on the website speed and the scripts are downloaded after all main sections of HTML and CSS are uploaded.
You can do without Google Tag Manager if your website has a code of a few external services. A standard set for an informational project is larger: “Metrica,” Analytics, VK, and FB Pixel, comments from Vkontakte and other services. In this case, you better use GTM.
Analytics instruments are vital for developing your website. You need to constantly track the effectiveness of advertising formats, widgets, and other elements. If no one shares them, it is better to remove them. GTM together with Google Analytics will show the statistics of all the setup conversions.
Thanks to Tag Manager, you won’t need to hire a developer or buy extended plugin versions. There are a lot of WordPress solutions for uploading the block “Share in social networks” and many of them show statistics only in paid versions. You may trick the restriction by counting link clicks from the container through GTM and not paying for the pro-version.
Analyzing the number of redirections via partners URL or blocks of content advertising can also be done. You might as well generate the code of micro marking and insert it without any external plugins.
Tag dispatcher solves almost any task that a web-master may have. You only need to get used to the interface and learn how to use it. We’ll discuss it in more detail in the practical part of the article.
The Difference Between Tag Manager and Google Analytics
A lot of new users get lost in these instruments. You can set up an Analytics code through GTM but to guarantee that your data is transmitted correctly, you need to create a resource in “Analytics.”
Google Analytics collects and systematizes data about the audience and its behavior. Google Tag Manager is a component that allows you to set up expanded analytics and see reports in Google Analytics.
Tag Manager and GA add up to each other. For example, GTM allows you to change the mechanism of counting refusals that works in a weird way by default. Google Analytics counts any visit with a review of only one webpage as a refusal. The difference in figures in Metrica and Analytics can be up to 30-40%. The problem might be solved within a couple of minutes. Add a tag with a timer and count it as a refusal for all visits with a duration less than 15 secs.
Setup conversion tracking
Let’s practice now. We will show you a few ways to set up the transmission of the data on conversions when filling out the form.
Click ID
Suppose that your blog has an email subscription form and you need to understand whether it is effective. Subscriber figures grow slowly and you need to figure out what percentage of the audience uses the form.
For this, it is better to use Google Chrome browser and two extensions such as Google Analytics Debugger and Tag Assistant.
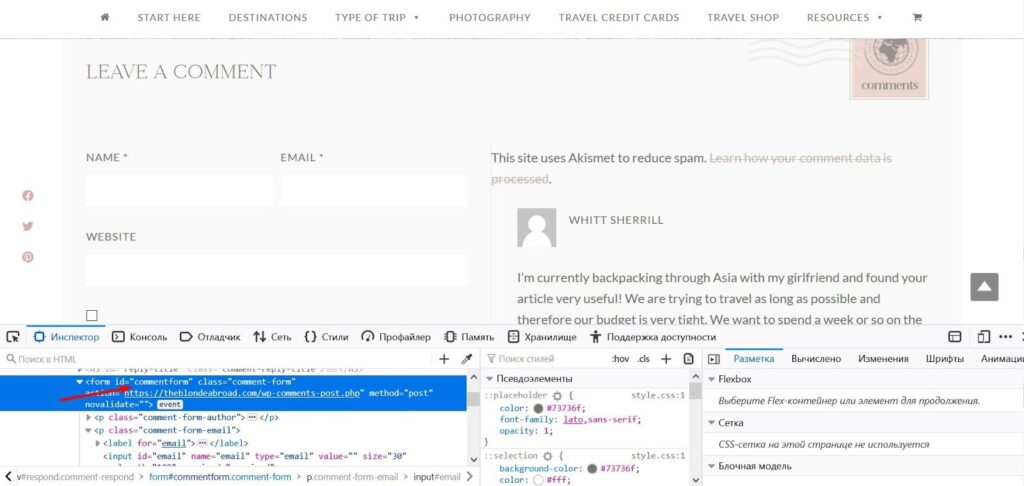
- Open the source code of the webpage in “Inspector” and find the form ID.
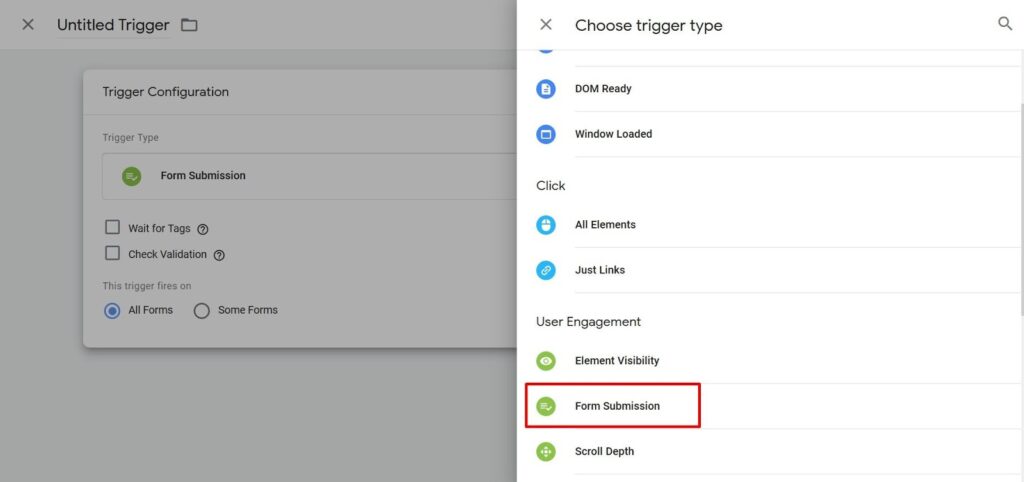
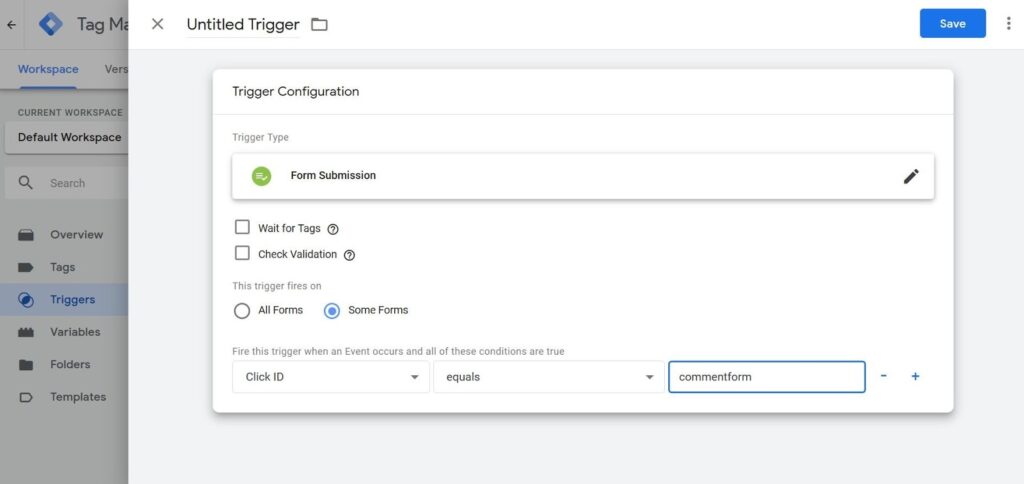
- Go to the page “Triggers: press “Create” and add a new event “Form submission.” Make sure to set a unique name so you don’t mistake it with other templates.
- In a new window, choose the option “Some forms” and press “Click ID” in the dropdown menu, then choose “Equal to” and fill in the ID.
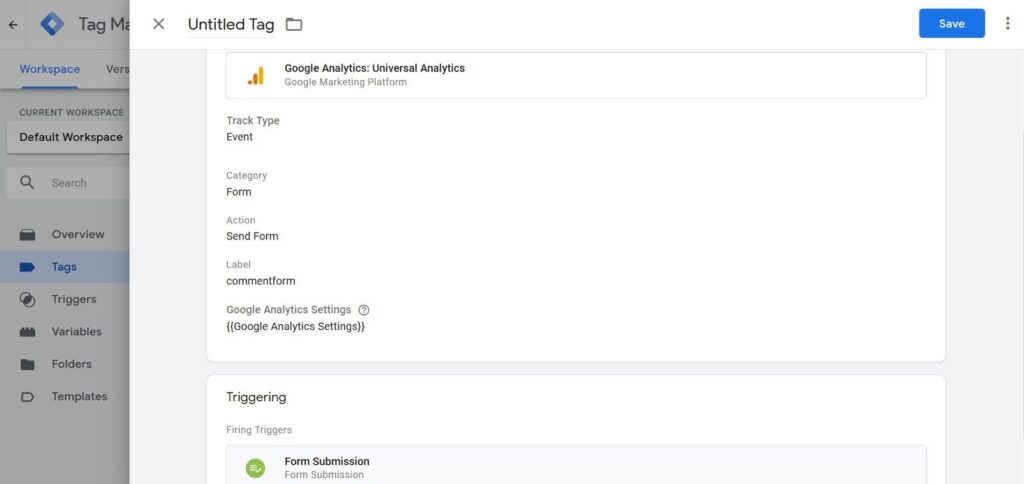
- Go to the page “Tags” and choose “Universal Analytics.”
- Fill in the settings as shown in the screenshot.
- Check that the tag appears on the list.
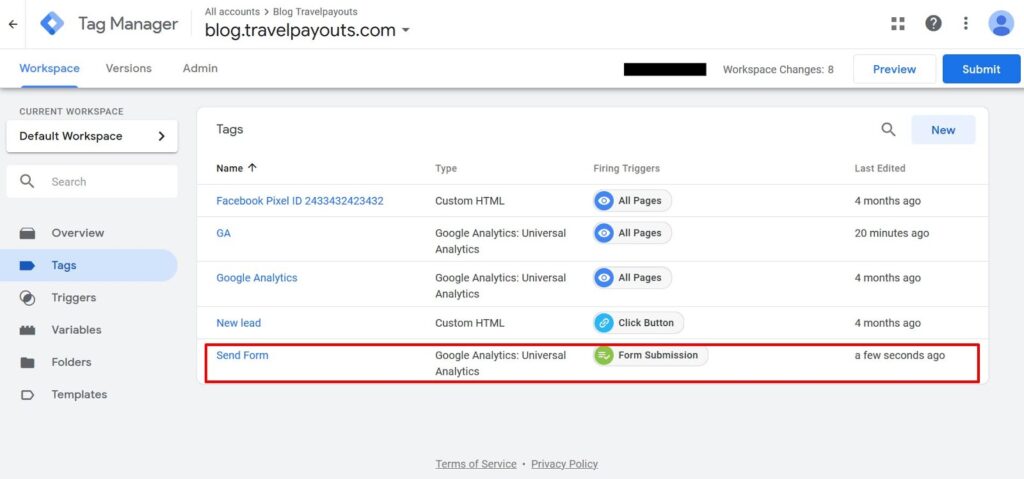
- Press the button “Publish” to update the contents of the container on the website.
- Open the website and test it through the add-in GA Debug that you installed earlier.

Likewise, you can set up tracking conversions from the form via CSS selector if it does not have a unique ID.
Datalayer
Data submitted through forms is sent in two ways: through the event submit and through AJAX. In the first case, you can use a standard trigger “Submission form” that we set up in the previous section. To use AJAX, you need to set up a user event in GTM and engage the datalayer. This is a control array that you can use to transmit data into Google Tag Manager.
Our goal is to make sure that when you submit the form into the control array datalayer, an event is added and is later recognized by GTM.
Many webmasters use CMS WordPress and one of the most popular plugins of contact forms on their websites: Contact Form 7, Ninja Forms, and WPForms.
Let’s discuss the process of the CF7 setup. Upon pressing the button “Send,” you launch an event of form submission that works according to several scenarios. We are now interested in the event wpcf7mailsent. It works when a message is successfully sent to the email box.
What you need to do:
- Create a tag of the type “Custom HTML,” insert a code from the block under this list, and choose “All Pages” in the triggers.
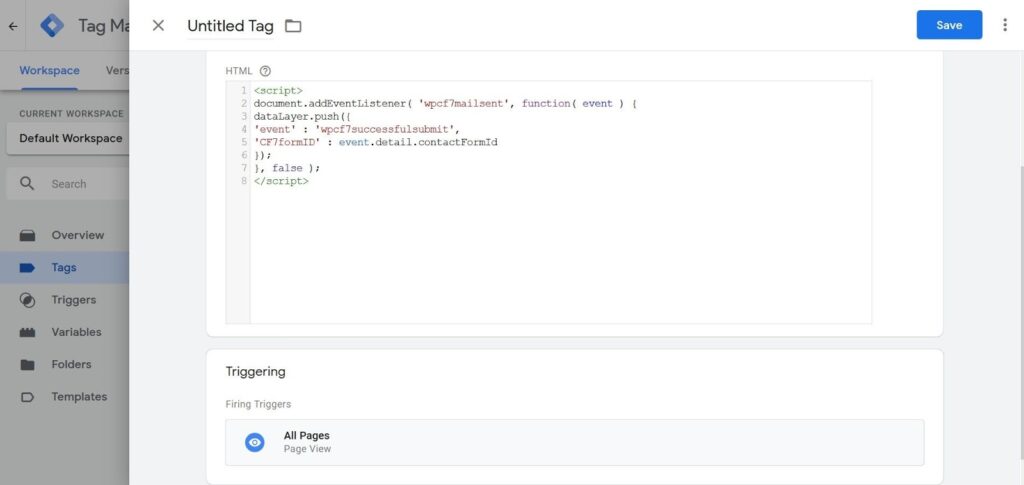
<script>
document.addEventListener( 'wpcf7mailsent', function( event ) {
dataLayer.push({
'event' : 'wpcf7successfulsubmit',
'CF7formID' : event.detail.contactFormId
});
}, false );
</script>
- Create a trigger of the type “Custom event” and set the “wpcf7successfulsubmit” value.

- Now create a “Contact Form Submission” tag with settings as shown on the screenshot.

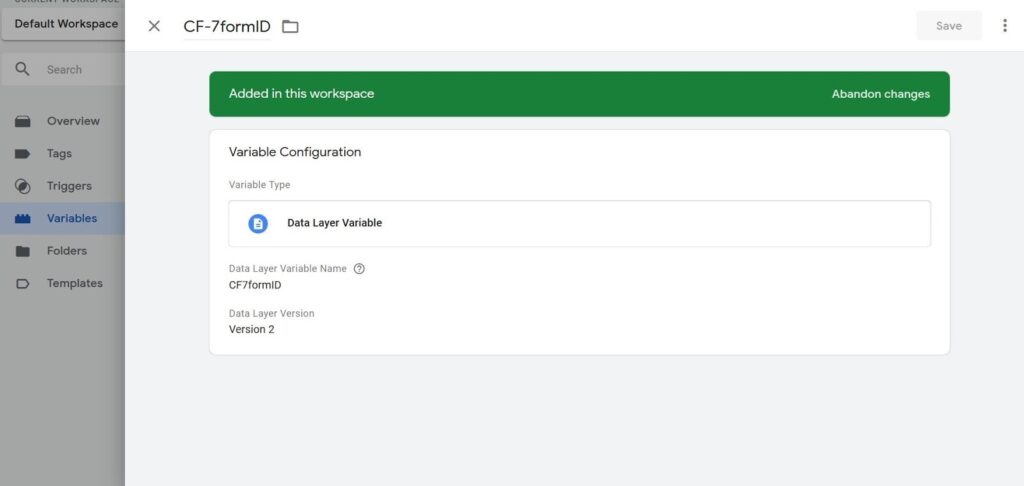
- Add a variable of the data level with the similar parameters.
- Open the tab “Goals” in the settings of Google Analytics administrator.
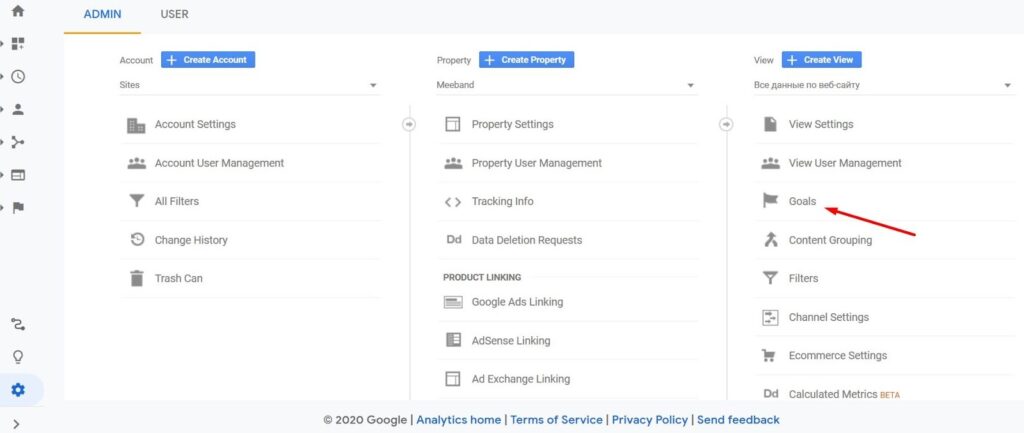
- Add a goal of the type “Own”.
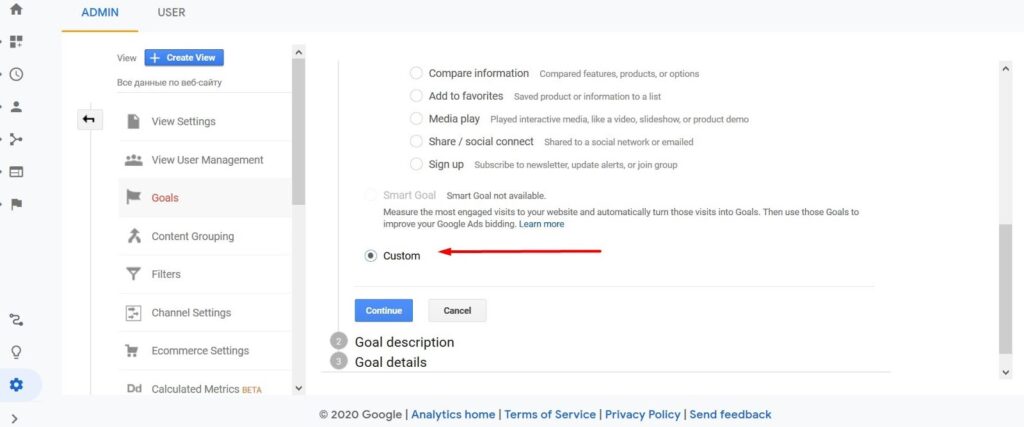
- Create any name and choose “Event” in the section “Type.”
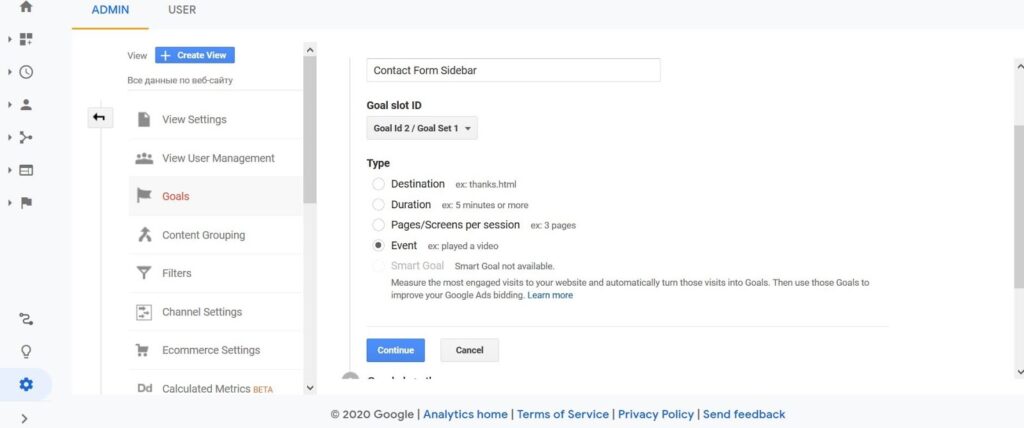
- Fill in the detailed information. You can indicate an ID of the particular CF7 form in the field “Label.”
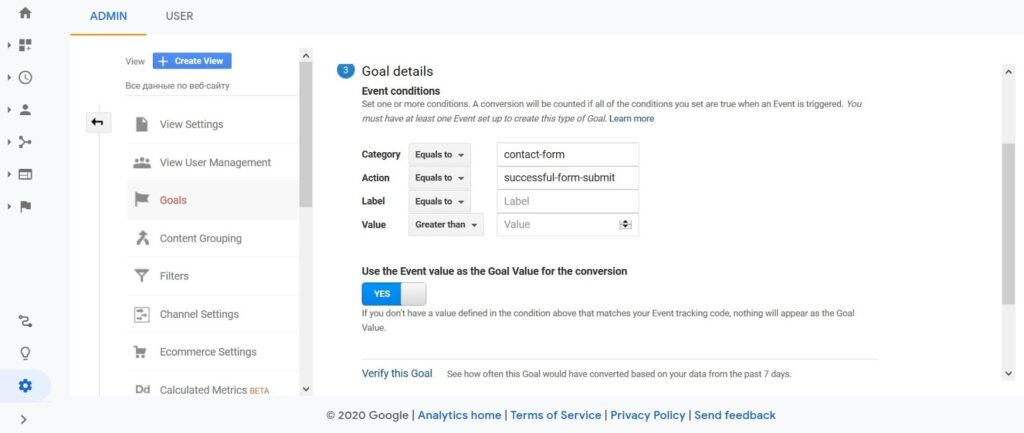
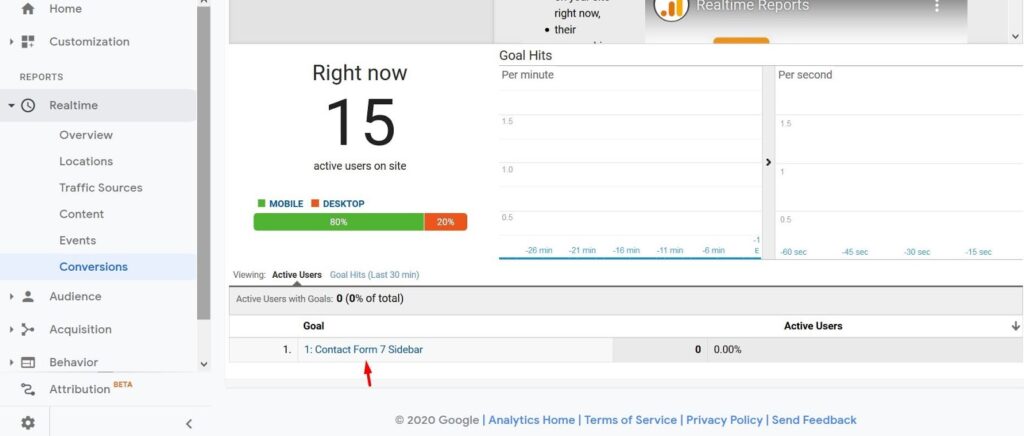
- Save the goal, fill in the form and open “Reports” in Google Analytics to check the conversions tracking.
Just like with Contact Form 7, you can set up the data transmission about form submission from any plugins. To do this, read the documentation for the extension and find the fitting event.
oorsGTM features are more than just counting form conversions. It can help you see how your users interact with the content. For example, how many users watch videos, click links, and share content in social networks. Learning and testing Google Tag Manager will take some time but it will pay off over and above when all your users’ actions spread before your eyes. This way, you will be able to better understand your audience’s needs, change web page structure, and give your users what they really want.
Four Tips for New Users
1. Check settings in GTM.
2. Use preview mode and extensions for debugging.
3. Do not forget to publish the changes in the container.4. Test event and learn reports in Google Analytics.